Administrative Details
In Wealth Management, Client tab, and the Estate Details - Edit menu option, select the Administrative Details tab. Within here you can enter the Personal Representative(s) as outlined in the will.
Select the Add New Entry button next to the Personal Representative(s) field to open the Select Entity box. To find an entity click in the Select field and type the first few letters of the personal representative’s name. Select that representative from the search list and click OK. If you need to add a representative not already in the database, select the Add New Entry button again and Troika will open the New Entity Wizard. Select the type of entity (i.e. Individual) and click Next. Then add the required information to create the new entity and click Finish.
To edit the details of one of the Personal Representative(s), highlight the representative's name and click the Edit button.
To remove a representative from the list, highlight the appropriate representative and click the Delete button.
Once you have added the representatives to the estate you can easily manage their authority by using the arrows to change their position.
You can also change their PR Status from the drop-down list on the right, underneath their address.
If a company is included as a personal representative, you can select the PR Contact within the firm from that drop-down list.
To complete this tab, you should select the Probate Registrar and complete the relevant details for your firm:
- the date you or your firm were instructed to manage or allocated the estate.
- check the check box to suppress the firm's address on the IHT421 (if the application needs to be made via a third party), if required.
- the date the firm finished or ceased managing the estate.
- the date the creditors' notice is due to expire.
- the date IHT has been cleared.
Family Details
The Family Details tab in Estate Details – Edit is where you can enter the information on the family members.
If there are surviving Children and Grandchildren you need to make sure to tick the 'Surviving Deceased?' box and enter the 'Total' so this can be reflected on the IHT form.
To add a family member, click the Add New Entry button next to the relevant section and either select the contact from the database or Add New Entry to follow the New Entity Wizard and add a new entity to the database.
You do not need to enter details for each individual family member if no bequest has been made to them.
If you want to edit an existing family member or if you want to add or amend contact details, highlight the contact and then click on the Edit button.
In the event you want to delete an existing family member, highlight the contact and then click on the Delete button.
Beneficiaries
The Beneficiaries tab in Estate Details – Edit is where you can enter the details of the legacies and bequests, which will be required during the estate’s administration period.
A residuary beneficiary needs to be added first before any pecuniary legacies and specific bequests can be added to the system. This is due to the way the system accounts for the distribution of any remainder penny (in the event that there is one, when it comes to distribute the residuary estate).
To add a beneficiary to the estate, click on the Add New Entry button to open the Add Beneficiary window.
Step 1: Select if the beneficiary is a Family Member? or Other?
Step 2: Select the beneficiary from the drop-down list or Add New Entry button to follow the wizard.
Step 3: Add the details of all the bequests. Select the Type of Bequest from the drop-down list and add the details.
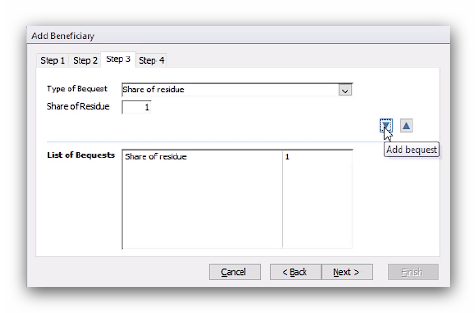
For residuary beneficiaries, you need to enter the Share of Residue as an integer reflecting the fraction of the share that the beneficiary will receive.
For pecuniary legacies and specific bequests, you need to enter a Value and Description.
Once you are happy with the details, click the down arrow to add it to the 'List of Bequests'.
Step 4: Check the summary of the bequests to the beneficiary. If all the details are complete, you can click Finish and add the bequests to the estate.
If you need to make an amendment to a beneficiary’s bequest, or include an additional bequest, highlight the relevant beneficiary from the list and click on the 'Edit Beneficiary' button. This will open the List of Bequests, and give you the options to edit, delete or add new.
There is also an option on the Beneficiaries tab to link a bequest to a specific asset.
Using the button that will appear once you have loaded details into the estate at the date of death. If a bequest has been linked to an asset it will appear in this window with an asterisk *.
To delete a beneficiary, you first need to delete the transaction for the bequest via the Trial Balance. More information on editing and deleting transactions can be found in the guide on Managing the Administration Period of an Estate in Troika.
Once the transaction is deleted, you can delete the bequest and the beneficiary from the estate.
Adding a Class of Beneficiaries
You can add a non-specific beneficiary in the event that you don't have all the details for a beneficiary or to account for a class of beneficiary rather than an individual.
To do this, click Add New and select Family Member in Step 1.
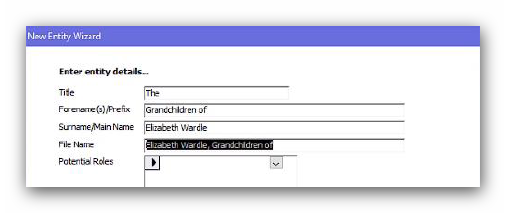
In Step 2 select Add New and select the type of family member. Select Add New again to open the Add Entity Wizard. For the type of entity select 'Other' and click Next, then complete the details. The below example is for a class of grandchildren.
Click Next again, then Finish.
Once the entity is created you can then enter the rest of the details of the bequest in Step 3. If you know the number of individuals in the class you can either add a line for each or you can create one entry for the total amount.
If you want to change a non-specific beneficiary into a single beneficiary, select the non-specific beneficiary from the list and then click on the Edit button. Change the Type to 'Individual' and update the details appropriately.
If you want to change a non-specific beneficiary to multiple beneficiaries, simply add the individual beneficiaries as you would for any other beneficiary and then edit or delete the entry for the non-specific beneficiary.
This article was last reviewed 05/2020.