This video tutorial will show you how to use the new onboarding functionality.
Onboarding is an easy process to add new entities to the system. It uses a workflow to allow you to collect the information required to create a pending entity which can then be approved to become an active client.
This process will replace Clients - Add in Troika Administrator. We’ve included the options as standard to add the following new entity types to WealthWorks+:
- Onboard Trust Entity
- Onboard Company Entity
- Onboard Foundation Entity
- Onboard Partnership Entity
- Onboard Private Investor Entity (Individual)
In the event you require assistance with the control levels, some of which are a required field in the onboarding process, the Managing Control Levels within WealthWorks+ tutorial may assist.
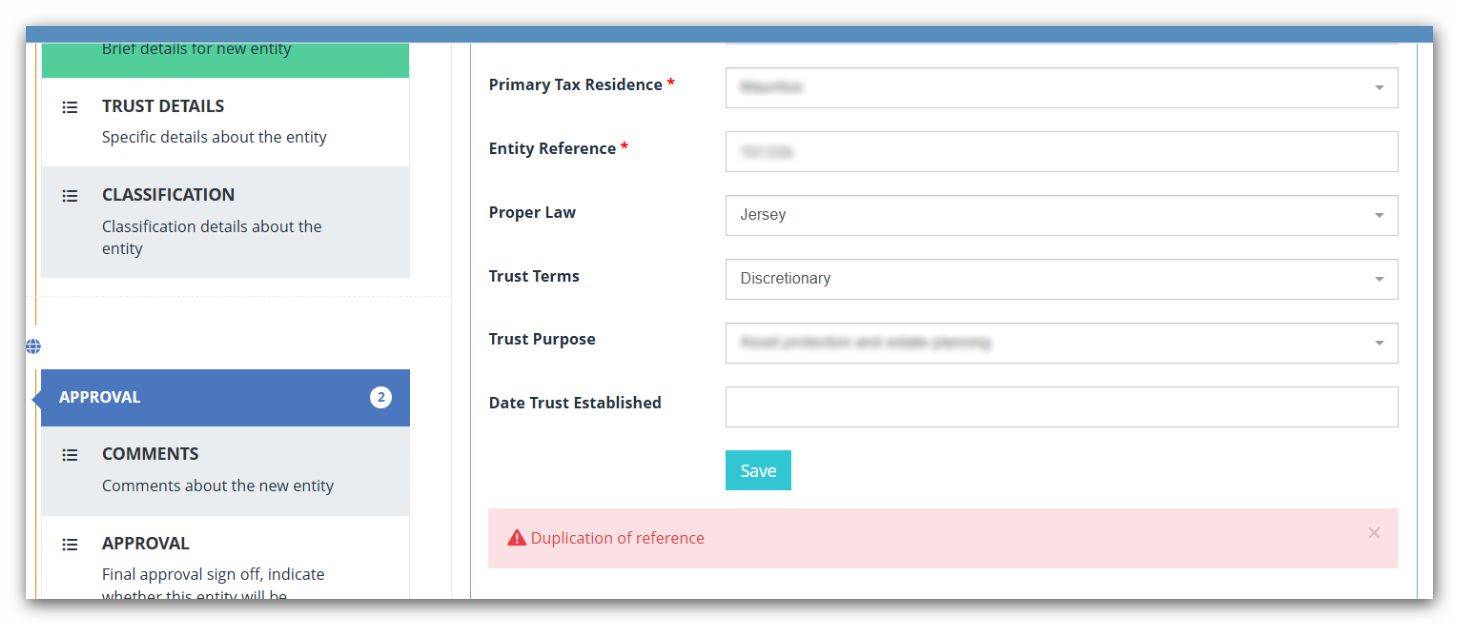
In the event you see a Duplication of reference warning when adding an onboarding record in WealthWorks+, please search WealthWorks+ for other records sharing that Entity Reference.

Two records are unable to share the same Entity Reference. Amend the Entity Reference in use on one record, and continue your onboarding.
In the event you cannot locate any other record sharing the same Entity Reference, please contact support for further assistance.
Tutorial Transcript
If you have access to the Onboarding List you can create and edit any entity currently being onboarded whether it was added by you or any other user with access to the Onboarding List.
(00:20) To onboard or add a new client, trust or entity select the Entities menu option on the left hand side and then Onboarding List. This will take you to the current list of entities being onboarded. To add a new entity, select the Onboard New Entity button. Select the type of entity from the drop down list and click start. This will open a new onboarding workflow. (00:45) Your onboarding workflow may look different to the one in this video as it is possible to configure the workflow to meet the onboarding requirements of your organisation.
(00:54) You must complete the basic contact details and click save to start the onboarding process for a new entity. If you do not click Save the details will be lost. Any mandatory fields within a section will be marked with an asterisk. You will not be able to save your progress if those fields have not been completed. Most steps in the onboarding process need to completed in succession and you will see a no access icon if you try to select a step that requires preceding steps to be completed first. The section will also be shaded grey. Any sections available to complete are white and once a step has been completed the section will turn green but you can click on the title to go back to that step to add more details. You can also see how many sections are valid in the workflow heading. A valid section has been sufficiently completed for the entity to be successfully onboarded.
(01:48) If you need to exit the onboarding workflow make sure you Save the details for the step you are on and either click Close to go back to the Onboarding List or navigate away from the workflow using any of the menu options. To return to an onboarding workflow already in progress go to Onboarding List and find the entity you require, click on the Actions button and then Continue with Onboarding. This will take you back to the last step you were working on in the onboarding process.
(02:19) An entity that is currently being onboarded will not show in the main Entity List until you have completed the Classification section as this defines the security group and access permissions. Once the entity is available in the Entity List as Pending you can view the full administration details as you would for an Active entity. When an entity has finished the onboarding process, you can click the Complete Onboarding button and complete onboarding. This will then change the entity status from Pending to Active. If an entity has been rejected the details will be removed from the Onboarding List and the details will become inaccessible. This action is also irreversible.
